Nothing Performs Like Chemtronics

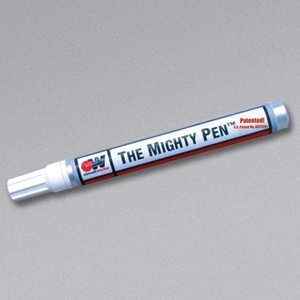
CircuitWorks The Mighty Pen

The Mighty Pen® is ideal for precise removal of label adhesives, marker and ink stains, and conformal coating from printed circuit board. The unique marker tip dispenser provides controlled and exact application.

The Mighty Pen® allows for quick, convenient and precise spot removal of ink, label adhesive, conformal coating and most stubborn to remove soils. The solvent evaporates quickly and provides low surface tension for superior wetting.

Features & Benefits

  • Outstanding cleaning ability
  • Marker dispenser provides controlled and exact application
  • Mild citrus aroma
  • US Patent 6,677,292 and 6,677,293, and other foreign patents

Applications

  • General purpose cleaning and refurbishing of equipment
  • Removes ink stains, label adhesives, and difficult to remove soils

Swipe to View Add to Cart Button 

Part # Size
CW3700

11 g (0.39 oz) pen on blister card

Contact Us for Pricing

FAQ's

How do I use a conductive pen?

Here's a step-by-step guide on how to use a conductive pen: Step-by-step process:Expose conductive surface of repair area: When repairing a trace, conductive ink needs to have good contact with the beginning and end of the gap. This often involves scraping way resist to expose the conductive surface. Prepare the surface: Clean and free from any debris, dust, or old solder. You can use isopropyl alcohol and cotton swabs to clean the area properly. Shake the pen: Before using the conductive pen, shake it vigorously until you hear the click of the internal bearing, which provides agitation within the pen. If the ink is dark and not a silver color, continue to shake the pen to fully mix the ink. Prime the pen: When using the conductive pen for the first time or after a long period of non-use, you may need to prime the pen to get the ink flowing smoothly. Press the tip of the pen against a scrap surface (e.g., paper or a non-conductive material) until the ink starts flowing. You may need to clear the tip of dried ink with a wipe saturated with solvent like isopropyl alcohol (IPA). Draw the conductive trace: Hold the conductive pen like a regular pen or marker, and apply gentle pressure to the surface while squeezing the barrel. Be precise and steady in your movements to get a clean line. You can draw lines, bridges, or connect components, just like you would with a pen or a pencil. Cure the ink: Let the ink air dry for at least 1 hour. Test the conductivity: Once the ink is cured, use a multimeter or continuity tester to test for continuity between the endpoints of the trace to ensure the connection is complete. Clean the pen tip: After use, make sure to wipe the tip of the pen clean with a wipe. This prevents the tip from getting clogged and ensures better performance in the future. CircuitWorks Repair/ Cleaning Products Learn more in our Blog Follow our Linkedin

How do I use no-clean, rosin, or aqueous flux dispensing pen?

Using a flux dispensing pen, whether it's a no-clean, rosin, or aqueous flux, is a straightforward process. Flux is used in soldering to remove oxidation and improve the wetting of solder, ensuring better solder joints. Here's a step-by-step guide on how to use a flux dispensing pen: Preparation:Ensure you have the appropriate flux pen for your application (no-clean, rosin, or aqueous flux). The specific type of flux depends on your soldering needs and the type of components you are working with. Clean the Surface:Before applying flux, make sure the surface you are about to solder is clean and free from any debris, dust, or oxidation. Clean it with a lint-free cloth if necessary. Prepare the Flux Pen:Remove the cap of the flux pen.Tap the tip on a flat surface to saturate the tip.If there is dried flux or other residue on the tip, rub it off on a wipe. Apply Flux:Hold the flux pen like you would hold a regular pen or marker, with the tip facing downwards.Gently press the tip against the surface where you want to apply the flux. Be careful not to apply too much pressure as it may lead to excessive flux application.Move the pen across the area where you want to apply flux. The flux will flow out through the tip as you move it. Soldering:Once you have applied the flux, proceed with the soldering process immediately. Clean Residue (if applicable):If you are using a no-clean flux, it is designed to be left on the board without cleaning, depending on the requirements the electronics. If you used a rosin or aqueous flux, you should clean the board after soldering to remove any residue. Use a cleaning solution that is compatible with the type of flux you used. Recap the Flux Pen:After use, make sure to recap the flux pen tightly to prevent the flux from drying out or leaking. CircuitWorks Repair/ Cleaning Products Learn more in our Blog Follow our Linkedin

Is there a good way to remove labels and sticky residues?

Old identification or QC fault labels can be difficult to remove. They either leave sticky adhesive behind that is insoluble by commonly available solvents like isopropyl alcohol (IPA), or are so dried and baked-on that they won’t budge. While consumer products like Goo Gone or bug-and-tar remover are common to see on workbenches, Chemtronics offers a cleaner that is actually intended for PCB repair called The Mighty Pen®. It contains a fast acting solvent that breaks down dried and sticky adhesives.

How do I figure out the shelf life of a product?

The shelf life of a product can be found on either the technical data sheet (TDS), available on the product page, or by looking on the certificate on conformance (COC). The COC can be downloaded by going to https://www.chemtronics.com/coc. Once you have the shelf life, you will need to add it to the manufacture date for a use-by date. The manufacture date can be identified by the batch number. The batch code used on most of our products are manufacture dates in the Julian Date format. The format is YYDDD, where YY = year, DDD = day. For example, 19200 translates to the 200th day of 2019, or July 19, 2019. This webpage explains and provides charts to help interpret our batch numbers: https://www.chemtronics.com/batch-codes.

Articles

Flexible Electronics Soldering Challenges: CircuitWorks Conductive Epoxy to The Rescue

The recent years have witnessed a tremendous transformation in electronics, from rigid forms to flexible, soft, and stretchable forms. These technological advancements will allow future electronics to be light and adaptive to the human body. In the quest for fully flexible commercial electronics (...
Read This Post

Ultimate Guide to Benchtop PCB Rework & Repair

The reality is that no soldering operation produces perfect assemblies every time. Even the highest quality components fail from time-to-time. That’s why understanding the best rework and repair methods and materials is so important for those who manufacture, maintain, or repair printed circ...
Read This Post
You did not finish submitting your information to request a sample